We continue our Firebase_auth series by doing some preliminary form validation and Error Handling; making sure the login fields are populated and the right format as well as showing any errors that come directly from Firebase.
IMPORTANT STEP: This is a continuation of our Firebase Auth Introduction tutorial. I will touch on the flutter code itself briefly in this tutorial, but if you haven't set up Firebase in your app yet then you'll want to click here and at least go through the first part of that tutorial.
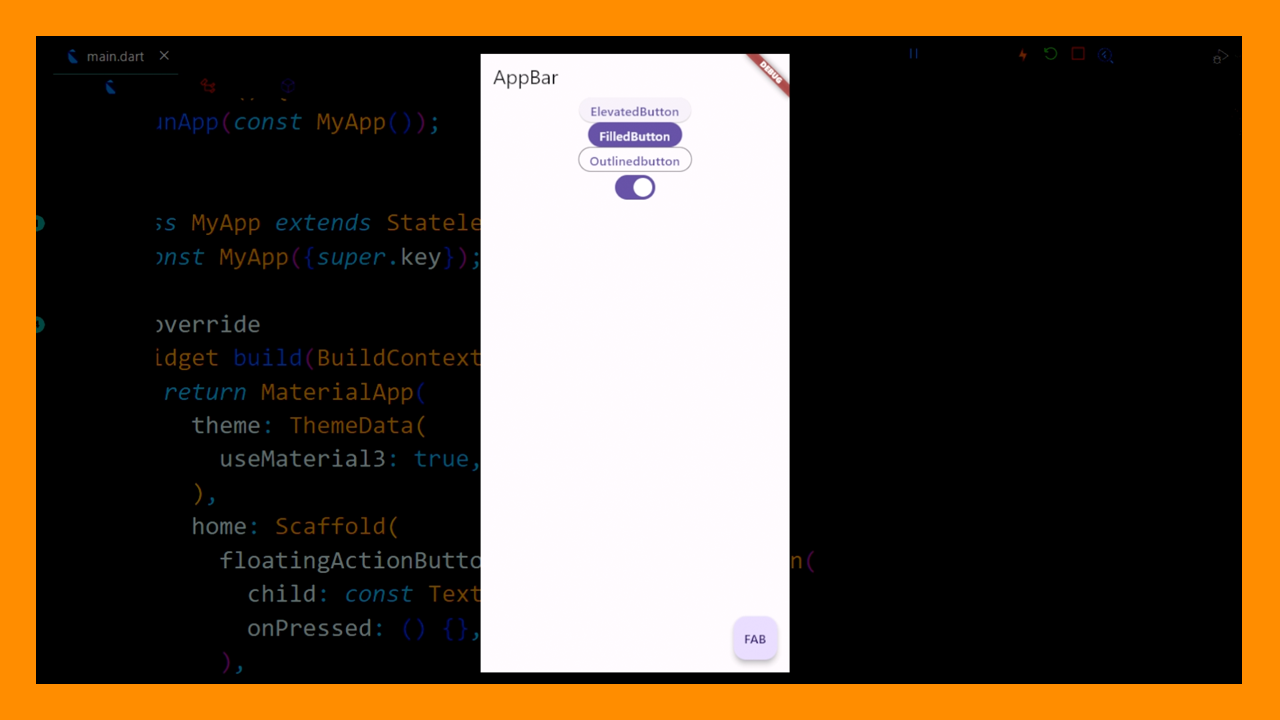
In the previous tutorial we did a very simple application that just had two text fields, one for e-mail address and one for password, and three buttons - one to sign up a user, one to sign in a user, and one to log out a user. But there was zero form validation or error handling in that video. So we're going to do that today!
So I'm going to briefly touch on what I did in the last video but if you want the full tutorial you can just click here and come back when you're ready.
So quick recap... We imported firebase core and auth:
And initialized Flutter and Firebase:
We set up controllers for e-mail and password and tie them to textfields in the scaffold body:
And then we added the sign up button:
the sign in button:
And a log out button:
And then we showed if the user was logged in by pulling the status of the user:
And then used a ternary operator, or a simplified if/then statement to show if the user was logged in or not in the AppBar:
So we will be touching on two different things today; form validation and error handling. We want to do as much form validation as possible because without it, we will have to go over the internet and communicate with firebase to receive any errors from them. Form Validation will trap some common issues without having to make as many calls across the Internet. And then we will take any errors from Firebase we don't trap with form validation and handle those as well. Plus we'll do a few other cosmetic things.
So first thing we're going to do is make sure the text fields aren't empty. We will start by adding this line at the top of _AuthAppState:
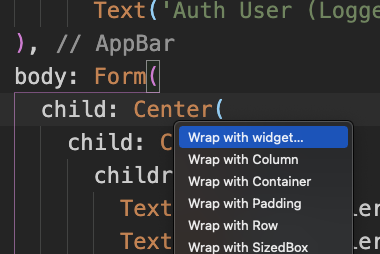 And then we will add the form and the key to the body. In VSCode you can right-mouse click on Center, click on refactor and select Wrap with Widget. Then we will enter in Form.
And then we will go ahead and tie the key to the form:
So we will first check to see if the e-mail address is empty. We will create the method for that, we will put it at the very bottom of main.dart:
And then we will change the TextField to a TextFormField and connect validateEmail to the validator:
And then the last thing we need to do is validate the form BEFORE we make our firebase call, so we'll add this line in the Sign Up Button:
 So since Null Safety is new to Flutter I'll try to explain what's going on. The e-mail address is sent through the validator automatically. So we say it can potentially come through null with "String? formEmail". Then we check to see if it's null or empty and if it is we return that the E-mail address is required. But our return is also set to String? (String? validateEmail) because as you can tell by the last line of the validateEmail method, if everything is ok, we are returning null. So when you press the sign up button, if the validators return null, it assumes everything is ok and contacts Firebase. Kind of hard to explain so hopefully that made sense.
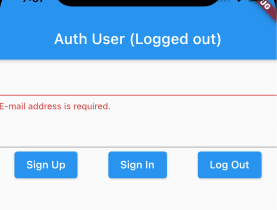
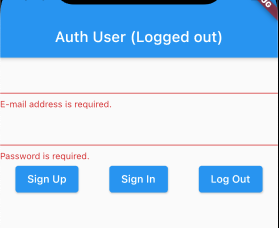
So if you run that, leave the e-mail address blank and hit the Sign Up Button, you will see the error, shown in the picture to the right.
Now we will do the password validation, we will start with the method, which we will put at the very bottom of main.dart:
And then we will attach it to the TextField and rename it TextFormField:
And then we're able to test it as well by leaving the password field blank and pressing the Sign Up button.
So we are checking to make sure there is an e-mail address, let's go ahead and make sure the e-mail address is an acceptable format as well:
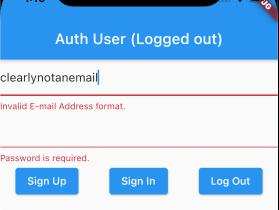
So the pattern checks to make sure the email address is in "[alphanumeric]@[alphanumeric].[alphanumeric]" format. If the e-mail address doesn't match that pattern, we let them know.
Now it's time to make sure the password is the right format. It's going to be a little bit more complicated, let's put the code in first:
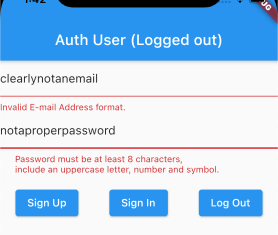 So as the return message explains, we want the password to be at least 8 characters, it needs to include at least one uppercase letter, one number and one symbol.
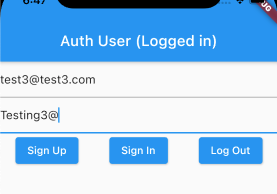
And of course if you format the e-mail address correctly and you format the password correctly you are able to sign up correctly (you can tell by the fact we are now "logged in").
So now that we (in theory of course) took care of any user error locally, we will present an error from firebase if there is one. we will start by adding an area in between the password field and the buttons. First let's create an error variable:
And then we'll just add a text widget for now to display the error in between the password field and the row with the buttons:
Nothing is going to show at the moment, we have to grab the error from firebase and display it.
So now we need to add a Try/Catch. What a Try/Catch does is... well it tries some code, and if it fails for some reason, it reports back. In this case we're going to try to sign up the user into Firebase, and if it fails for some reason, we're going to take the error we get from them, and put it in that Text widget. So we'll add the try/catch like so:
 So we are going to try to create a user with email and password. If it is successfully, it will make sure the error message is empty, and set the state. However, if there is an error, it's going to drop down to the on FirebaseAuthException catch and we are going to put the error message we receive from firebase into our errorMessage variable. And then when we setState at that time, it will display the error on the screen.
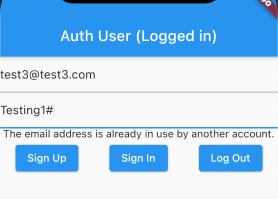
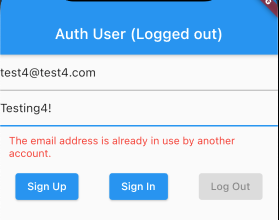
And as you see if we try to sign up a user with the same e-mail address as the user we signed up earlier, we receive an error message from Firebase.
Now we will go ahead and add it to sign in:
And log out:
 Firebase will also return an error if it isn't able to communicate through your Internet connection. I disabled my wifi on my laptop and attempted to log in, and you'll see the error that I received on the right.
So these are some basics on Form Validation and Error Handling, you can obviously do a lot more, you can use snackbars to display the errors for example, you can have custom error messages, among other things. But this should give you a general idea to get you moving forward with your app or project.
Let's do a few cosmetic things that you might find useful and can probably expand on for your own application. The first thing we will do is disable the buttons depending on the users status. We are going to put this code in the sign up and sign in buttons for example:
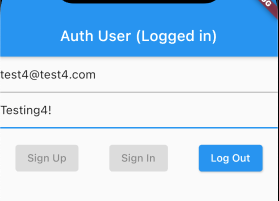 So this uses a ternary operator to check to see if the user is logged in, if they are not logged in and the button is pressed, it connects to firebase and does its processing accordingly. However, if the user is logged in (user would have data if they are logged in, and therefore not (eg: !=) be null), it just disables the button.
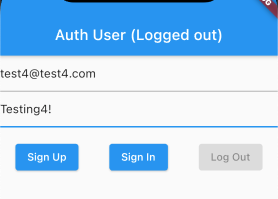
And we will do the opposite on the log out button, if the user IS null (which they will only be if they are logged out) then we want to disable the button:
And we will show that by logging the user out.
We can also add a loading identifier. We'll do something simple for this tutorial and just show loading on the button itself. First thing we will do is create a loading variable:
And then we will set the variable to true when a button is pressed. We will start with the sign in button:
And then after Firebase processing we will make sure we turn it back to false:
Now we need to do one more thing before we can actually see what's going on. We are setting the variable, we just aren't doing anything with it. So let's change the button when it is pressed:
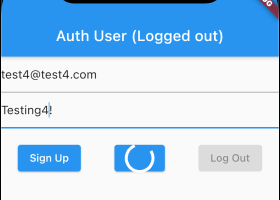 So if isLoading is set to true, it shows a CircularProgressIndicator, otherwise it just shows the text. It's not super pretty in this tutorial but it gives you an idea of what you can do. You can also use a snackbar here, or fluttertoast, among many other things. Don't be afraid to get creative!
Two more things and then we will wrap this Tutorial up. The first is, let's move where we set the error message to blank to inside the same setState we are setting isLoading to true:
That way there is a small window where nothing is in there and the user gets a small visual reference that it *did* update the error, even if the error message is the same.
And then lets put some padding around the error message itself and make it red:
That will give it some separation for this tutorial but again don't be afraid to get creative!
So we will wrap this tutorial up here - this should be some fundamentals to get you started and hopefully you're able to take this and expand on it and create something awesome!
Very long content goes here