Learn built in date options you can use with Flutter including adding and subtracting from dates, getting the difference between two dates, checking if a date is before or after another date, and some minor formatting you can do without additional plugins.
At some point when you're building apps using Flutter you're more than likely going to need to work with Dates. And working with Dates can be somewhat frustrating and confusing. So here's a little introduction on working with Dates that will get you started.
The first thing we will learn is how to get the current date and time, by using now. Clear out Everything in main.dart, enter this and hit run:
And you will see in the debug console the current date:
And you can set a specific date by using parse like this:
This will, of course, produce this:
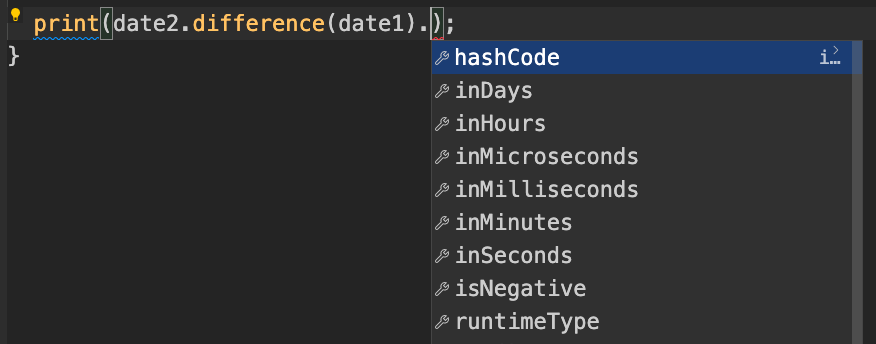
To get the difference between two dates you can use... you guessed it... difference. So let's set up a few variables to play with:
So our first date is midnight and our second date is 5am the same day. We can now get the difference in minutes:
and hours:
You have a few options for getting the difference in the dates:
Now you will notice if you set the dates say, like so:
And you try to get the difference in Days:
The result will be 0 days:
It's because even though your second date IS the next day, it hasn't been a full 24 hours so it is saying 0 days. You can resolve that by either dividing the minutes by 24 hours and rounding up:
Or ideally probably just remove the times:
Or you *could* just get the hours and minutes by doing this:
The % is a modulo operator and provides you with the remainder when dividing.
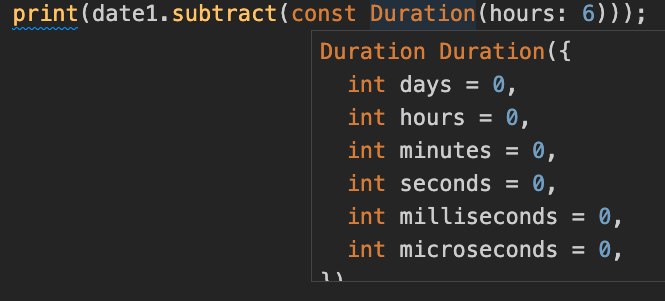
We can also add to or subtract from a date. If we take this date here:
We can add 6 hours to it by doing this:
Or subtract 6 hours by using subtract:
And again you have multiple options for duration:
You can also see if a date is before or after another date. Using these two dates here:
We can run this:
Will produce true:
And in relation, isAfter:
Will produce false.
So everything so far has technically been Dart, which is the programming language Flutter runs on.

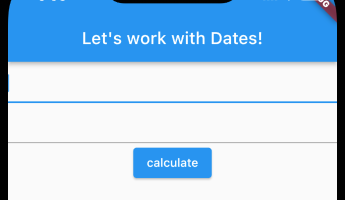
So let's actually do some date stuff inside a flutter app. We will start with our tutorial boilerplate:
Keep in mind this is just a simplified boilerplate used for this tutorial and shouldn't be used as a reference for proper app structure.

Now let's add a form with two text fields and a submit button:
Ok now let's set up three variables; two for the dates and one for the result:
Now we will add the result to the appBar:
And then let's go ahead and set the default values of the text fields to the values of our two date variables:
Now let's get some results! Let's first set up a global key so we can access the form field values when we press the calculate button:
And then we need to set the key in the form like so:
Now we need to add the onSaved calls to the textFields that set the two date variables:
Note: The ! on "fieldValue!" is saying we guarantee that the fieldValue will not be null. We are just setting it this way for this tutorial. In a real scenario you would want to error trap for null before doing these calculations.
And then in the ElevatedButton we will add this code:
We won't be doing any validation since we are just wanting to do date calculations, but you will normally want to validate your form before saving.
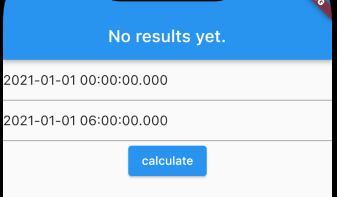
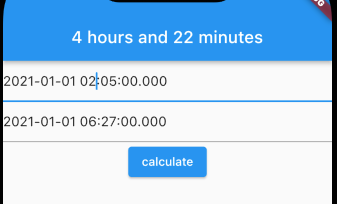
So this saves the field values and then displays the difference in hours between the two dates in the AppBar:
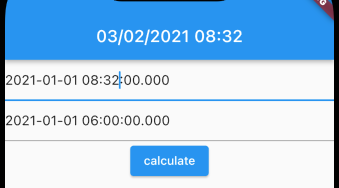
Now you CAN do some minimalistic formatting without adding any extra dependencies to your app. Here we will take the first date, add 60 days to it, and then format the date to be month/day/year hour:minute.
So this gets the job done as you see here:
But if you want advanced date formatting it's best to use a date formatting package... Which we will get into in another video!
Click here for the source code. This is actually before the date formatting.
Very long content goes here